Monday, October 2, 2017

Piggy Yarns is born!

Hi everyone

After 4 years of people asking me if I sell my yarns, and me always replying "Not right now, but maybe someday", that someday has arrived!

On October 1st, 2017, my 44th birthday, Piggy Yarns was born on Etsy!  My first shop update consists of 18 different colour ways. Some are one of a kind, while some of them have 2 or 3 skeins available. There are a total of 35 skeins in all available, and I am already working on more of them for the next update, currently planned for October 15th.

Some of my skeins are done with food safe dyes, while others are done with the commercial acid dyes.  I was doing a special project for someone and needed a really good black and a really good grey, so I decided to dabble a bit in the acid dyes. I bought some dedicated equipment for dyeing, and had at it.  I will be doing a post in a few days on my Adventures in Acid Dyeing.

I hope the shop is successful, and expect to be putting in a lot of time over the next few weeks/months getting it fine tuned. But for now, please stop by and have a look!

Friday, March 10, 2017

Liquid Easter Egg Dye Kits

A fellow Raveler asked a question in the What a Kool Way to Dye group about using liquid Easter Egg dye to make yarn. She had bought some kits at her local Dollar Store and didn't realize that a couple of them were the liquid dyes. So she posted the question in the group forum, and I accepted the challenge to see how well the liquid dyes would work on yarn.

I have dyed yarn in the past using the Easter Egg dye tablets. In fact, my first ever hand dyed yarn was done using an dye kit I bought at a Dollar Store, but my kit had tablets. I had not seen the liquid dyes, and was curious how they would work.  I tried our local Dollar Store, but the only one they had with liquid in it only had 3 colours and game with a "gold glaze." I did buy it, but have not tried to use it yet.  As a side note, I wont be able to make gold yarn because the glaze does not really contain any colours... it is mostly sparkly stuff, alcohol and wax by the look of it.

Off to WalMart I went in search of a kit that had the liquid dyes, and I found this one:
Roll on dye for Easter Eggs
This was the first time I have paid full price for an egg dyeing kit since the first time I used one, but I really wanted to try it out and see how it would work.  A tip for anyone who wants to try this and has a bit of patience. Places like WalMart and the grocery stores tend to put all of these kits on sale for at least half price the day after Easter. I have even found them at one of my local grocery stores for 50 cents after a couple of weeks. So if you have patience, you can score them pretty cheap. The Dollar Store, on the other hand, seems to just put them away and put them out again this year. And if they are anything like mine, they cover the $2 price tag printed on the box with a $2.50 price tag.

Now these kits contain a lot of stuff you don't need if you are dyeing yarn. I have given away lots of stickers and glitter and glue to friends with kids, and thrown out I don't know how many little metal holders, because I just don't need them.  Here are the contents of this kit - less to throw away, but not so sure that any of it could be used for other things.

Paint rollers, stands (I think) and 5 packages of dye
The only thing I really need out of this are those 5 packages of dye.  On the back of the box it talks about how you can get multiple colours, because you can mix the colours together, but these are not very big packages. They are a little bit bigger than ketchup packages you get with take out, but not much bigger.  And there is not a lot to mix. I think if you wanted to mix colours, you might need multiple packages.

So I gathered up everything I was going to need/use for this experiment

  • 1 roll it! kit
  • 1 skein of bare Opal sock yarn, 96g (due to a miscalculation when using my new yarn swift with counter)
  • 5  mason jars (500ml size)
  • 1 supersized rimmed baking sheet
  • 1 cooling rack that fits inside the rimmed baking sheet
  • Citric Acid powder
  • Medicinal syringes
  • Plastic Wrap
  • Microwave Safe place
  • Towel
  • Baby Shampoo and Moisturizing Conditioner 

First thing I did was soak my yarn. Because I am hand painting the yarn, I added one tablespoon of powdered citric acid to the warm water I soaked the yarn in. This is about equivalent to 1 cup of vinegar, if you want to use that instead. Adding the citric acid to the soaking water helps the dye strike faster.  Let the yarn soak for at least half an hour. I think this one soaked for about an hour and half, just because I got distracted with a few other things, including doing the dishes so I could rinse my yarn when I was done.

And then it was time to mix up the dye stock.  To make this a fair comparison to how I dye with food colouring, I used the same amount of water. Now, for the most part, the amount of water does not impact the strength of the dye. It is just the medium used to get the dye on to the yarn. However, with hand painting, I do find that you can impact the intensity of the colour by having more water in the dye stock. I think this has more to do with the fact that if you have more dye stock and are hand painting, there is a greater possibility that you are going to have dye stock left over, which means you didn't use all the dye, so the colour is lighter.

I started by just putting the dye in the mason jars, so I could see how much dye I had to work with.
The contents of the dye packets, added to the mason jars
It actually looks like close to the amount of food colouring I would be using when I used my standard 6-10 drops of Wilton Colour Right food colouring, although this is a bit more watery.  I then added 1.5 cups of water to each jar, and here was my dye stock.
Yellow and pink look a little light, but let's see how it goes
Some of the Easter Egg dye kits talk about adding vinegar to the individual colours. I personally find you don't need to worry about mixing it into the individual colours as per the instructions, because you will be adding acid to either your soaking water or dye bath, depending on the technique you are using.

I set up my cooling rack inside my rimmed baking sheet, and prepared to apply the colours.  This is a really great tip that I got from someone on Ravelry a while back and I rarely every hand paint yarn without using this method. The baking sheet catches the excess water, and it also prevents the dye from pooling under the skein, which can cause the colours to run together and result in a muddle mess. Plus, you can squeeze out the excess water as you go, which also helps to stop the colours from running together.  Colour travels really fast on wet yarn.
Ready to add the colour! I like to section in a squarish type shape
Now usually when working with colours like this, I tend to use more of the pink, because it is my favourite colour, but for this one, I didn't make as many pink stripes... sometimes I just get distracted when I am hand painting and any plans I have for placing specific colours in specific places just go right out the window.

As I was applying the colours, it seemed like the yellow and the pink were both very pale.  I knew the blue was going to be somewhat pastel, just based on the dye stock, and the pink and yellow did look a lot more pastel than what I am used to working with.  And sure enough, as I was applying it, they were both looking very light. The yellow was particularly light, and I wasn't even sure it was going to look yellow... it only looked about half a shade or so darker than the bare yarn.  I did find, however, that as I added more dye to the individual sections, those colours were getting brighter. So the more I layered them, the more intense they got.
The top of the skein, after I applied the colours
After I used a little more than half of most of the dye stocks, I flipped the skein over. I have done this enough times to know that the back of the skein would be a paler version of the top, and that some of the colours would have blended into each other and run a bit. But you still need to flip it over and add more dye to the bottom. Especially when using superwash yarn that has acid in the soaking water, because it strikes so fast.
After the skein was flipped over
You can see in the picture that there are a lot of spots where the colour barely made it through.  If I had wanted more defined sections, I could have thickened the dye with guar gum, but I really was just winging it with this skein.  As a side note, if you really want to have fun with colours, when you flip it you can apply different colours to the sections to get more blended colours. For example, if I had added yellow to the pink section, I could have gotten some yarn that was light orange. You do have to be careful doing that though, because if you add too dark of a colour, you could completely change the whole section of colour, not just this back piece.

I kept applying the dye to the various sections of yarn until it was all used up.  I normally have dye stock left over when I mix up this much, but I wanted this to be a really good test of the liquid dye, so I made sure to use it all. I did have to empty the extra water out of the baking tray twice during this process.
After the dye was all applied
I wrapped my skein in plastic wrap, put it on a microwave safe plate, and heat set it in 2 minute intervals. I usually zap it for two minutes, let it sit for about 10 seconds and then zap it again. Some people leave it longer in between, but we all know I don't call myself the Impatient Dyer for nothing. I heat set it for a total of 10 minutes (5 of the 2 minute sessions), and then I pulled it out, flipped it on to the cooling rack, and carefully removed the plastic wrap.  I have discovered that if I do this, it cools way faster.
After being heat set, before washing
Once it was cool enough to handle, I filled the sink with warm water and added some baby shampoo and some moisturizing conditioner. I have recently started adding the conditioner to make the yarn a bit softer. Not sure if it is working or not, but it smells and feels nice when rinsing.   Once it was washed and rinses (no dye came out at all in the washing or rinsing cycle), I wrapped it in a towel, wrung out as much water as I could, and then put the yarn on the shoe rack in my dryer.  1.5 hours later and I my yarn was done.

Here is the yarn right out of the dryer, before it was re-skeined
The skein laid out flat

One side of the twisted skein

And the other side of the twisted skein
And then here is where the real magic happens... I re-skeined it, and here are three shots of the final result.


So my answer to the question of "can you use the liquid Easter Egg dyes to dye yarn" is a very enthusiastic yes! I did find that the colours are a little more muted than I normally work with, but I am the queen of saturated colours.  Most people who have seen it so far love it, and have said the colours are very bright and vivid as it is. Even if they are not the neons I am used to.

I am very happy with how it turned out, and think it will make some very pretty socks. I almost think that having the smaller sections of pink make the pink stand out more, so I am looking forward to knitting this us in the near future. Although I have to finish one sock that is in progress, and dye up and knit for another pair of socks that is part of a KAL due by the end of the month. But hopefully I will have Easter socks knit in time for Easter.

So if you are in the stores after Easter and you see these kits on sale, grab a bunch of them! Or, if you just love how this looks and want to try it right now, $2.48 is really not a lot of money, so splurge on one or two kits at full price.   Although when these go on sale for half price, I might pick up two more  of them and double the dye in the dye stock to see how deep I can get the colours ;)

Monday, February 27, 2017

Three times the yarn does not always mean three times the dye stock

Ask me how I know...

It is not like I just increased 6 drops of yellow to 18 drops of yellow because I was doing three times the amount of yarn... and then watched as the yellow took over all 6 cakes of yarn... and watched as I poured some very yellow water down the drain... and watched as the remaining yellow still in the cake decided that it was going to leech into the pink and give me more of an orange lemonade than a pink lemonade colourway... (FYI - I am using the Wilton Color Right food colouring system for these yarns)

I thought I was approaching it logically, but some days you have to realize that logic and yarn dyeing don't always go hand in hand.  And I also forgot one other key thing about dyeing with food colouring. For some reason, it takes a LOT less yellow to get a good colour than it does with something like pink or blue.  And the kicker is, I know this... any time I mix up my dye stocks the yellow strikes the fastest, and is the one I usually have the most of left over after I finish hand painting in multi colour... 

I bought myself a new roasting pan with a rack in it the other day and was super excited to dye some yarn in it. I wanted to try to replicate some of my skillet dyed colour ways (Pink Lemonade, Chicken Bones and Mint Chocolate were on the menu).  I was super excited to see that the roasting pan had a rack in it, so the cakes won't sit on the bottom, and that it would hold 6 of my 50g skeins.

When I got home, I wound off 6 50g cakes of Opal Sock Yarn, then mixed up the yellow dye stock using the "three times as much yarn should take three times as much dye" mentality, put the dyestock in the roasting pan, put it on the stove, and added the yarn...

My new roasting pan with 6 cakes of yarn

...and watched as the yellow seeped through the entire cakes and pretty much dyed the whole thing yellow.  I still flipped it over and dyed the other half pink, and came out with something that somewhat resembled my Pink Lemonade colourway, but not quite.

Sort of gives you an idea...better pictures to come, hopefully...

I repeated this process with the two other colourways (Mint Chocolate was green and brown, Chicken Bones was pink and brown), and realized that in the world of food colouring dyes, you can't always predict what you are going to get.

For my Mint Chocolate, using just 8 drops of brown and 2 drops of black gave me more than enough brown to get the colourway I was going for.

Pretty minty and pretty chocolatey as well
But for my Chicken Bones colourway, I dyed the brown twice (8 drops of brown, 2 black the first time, and 8 drops of brown the second time), and still did not get as dark of a brown as I wanted.
Chicken Bones, but more caramel filling than chocolate
I would have liked the browns to have been a bit darker in Chicken Bones, but I was not about to do the dye bath on the brown for the 3rd time.

So the yellow in Pink Lemonade might have worked just as well with just 6 or maybe 10 drops of yellow, while the brown in Chicken Bones might have done better if I had gone with 18 drops of brown, although 16 total drops of brown plus 2 black still did not make it as dark as I wanted.

Frustrating? A little bit... because I would like to have a magical formula that would just let me say "I used XX for one skein, so I can just double for two skeins, or triple for three." But it doesn't always work that way.  You really do have to get used to your dyes, and how they react.  Learn that colours with yellow take less, while colours with red or blue may take more.  And be prepared to overdye things if needed to get the saturation you are looking for.

I share this not to discourage anyone, but because I think it is important to share information like this. Does it mean if you have a magic number that works, you can't just double or triple it? Nope! Not at all. You might use the exact same dye in the exact same ratio and have it work just perfect for you.  I share this because I want any of my readers who embark in the world of dyeing to know that sometimes you just have to go with what the yarn/dye gives you :)  And even if you don't get exactly what you were looking for, you, or someone you know, may just love the final result.

Oh, and to share one more tip with you. Don't buy the same roasting pan I did. I got mine at Canadian Tire and it has non-stick coating. Back away from roasting pans with non-stick coating. After only three colour ways, the coating is peeling off the bottom of the pan and off the rack.  I think it is a combination of the amount of acid being used over the course of using the pan, and maybe having the roasting pan sitting on the burner of the stove. Although it is a roasting pan... you make gravy in a roasting pan on the stove so you would think it would work on a burner, but, again, here I am trying to use logic. Silly Reena...

I just bought some of that high temperature BBQ spray paint today, and am going to try to coat both the rack and the pan with that, to see if it will make them last longer.  I also just ordered two stainless steel pans, and am waiting for Paderno to do another blow out sale (or open their factory store) so I can buy some really good quality ones.  It was worth it to be able to test it out, and to be able to dye 18 cakes of yarn in a much shorter period of time. But in the long run, it was a bit of a waste of money.  At least if you are reading this and considering it, I might be able to save you some money when I tell you not to buy the pan. 

Monday, January 30, 2017

Hello to my fellow OSAATers

Since Nathan was so sweet in talking about me in his most recent podcast, and in linking to my blog, I wanted to post a special hello and welcome to anyone who finds my blog thanks to his podcast.

For those of you who are not quite sure what I am talking about, a few months ago I discovered the delightful world of sockmatician on YouTube while looking for some hints on brioche knitting. He had a tutorial video that I watched, and I loved his accent and his style of speaking.  In looking at his channel, I discovered that he was a podcaster, so I started watching. I quite quickly became enamoured with him, and watched all of his podcasts, his reviews, and some of his tutorials.  I was actually quite sad when I finally caught up, because now I have to wait for the new episodes to come out. Or I have to rematch the old ones, which I may actually do.

I have enjoyed him so much (hmmm...that sounds filthier than I had intended, but I am going to leave it) that I have added an "All Things sockmatician!" gadget to my blog layout. It is over there, under the Helpful /Favourite Links ----->

If you have not yet discovered him, I urge you to take a few minutes and check out one of his podcasts. I recently dyed some yarn for him, and he talks about me in his most recent episode (he also uses my yarn as the screen shot for the episode... I may have geeked out a bit at that), so of course I would recommend starting with that one, out of pure vanity, but you could just jump in and start at Episode 1.

Here is a picture of the yarns that I dyed especially for him and sent across the pond. I was delighted to see how happy he was with them.  I could not decide if I wanted to do a self-striping, a speckled, or a variegated yarn for him, so I did all three.

Labour of Love, Cake Sprinkles, and Rainbow Bright
I have had people say very nice things about these skeins, and have received some very nice compliments, as well as a few questions of "where can I buy your yarn" since the episode went live.  I am not yet at the point where I am ready to open any kind of Etsy store, but as some of my existing readers may remember, I had been pondering this for a while now.  I had hoped to build up enough stock to possible open a store in the first month or two of the year, but have unfortunately been dealing with some health issues that have slowed me down a bit.

That being said, if anyone absolutely MUST have some of my yarn, you can always message me on Ravelry (I am MissReena) and we can see if we can work something out. I make no promises, as my health is currently making more of my decisions for me than I would like, but it never hurts to ask :)

And now I sign off by quoted my favourite bearded knitter... "Just remember, life is a work in progress. Just take it one stitch at a time"


Monday, August 29, 2016

How To - Heat Setting in the Oven

A little while back, a fellow Raveler posted in the What A Kool Way To Dye group, asking about alternate heat setting methods. She does not have a microwave, and wanted to know of some different ways to heat set her yarn.

Most of the alternate methods of heat setting yarn seem to involve immersion. There were a lot of crockpot and stovetop suggestions, but they all involve getting immersing the yarn in water, which may not always give you the results you are looking for. If you hand paint your yarn, or are trying to speckle dye it, then full or even partial immersion could cause the colours to run.

There was one or two people who suggested steaming it using a double boiler, or a colander placed over a pot of hot water. I still have to try that method, but if the colander or double boiler is too small, then the yarn will get bunched together, and you may have the same blending colours issue.

So I started thinking about heat setting in the oven. I had thought about it before, and wondered how to do it. I know I could do rimmed baking sheet with water in it, but again, that would involve partially submerging the yarn, which I did not want to do. I wanted a way to keep the yarn out of the water, but still keep the yarn damp enough to not burn in the oven.

Then it struck me... a cooling rack. 
Using a cooling rack to help me dye my yarn
I use them when I am dyeing yarn to keep the yarn up off the surface to avoid colours blending too much underneath the yarn, and I have used one in the oven to cook bacon, so why not combine the two.  Yarn bacon.....mmmmmm.... 

No, just kidding... I meant the oven and dyeing the yarn on the cooling rack.  And because it is an oven, I could just set the temperature to the exact 180 degrees (F) that I needed, and 20 minutes later, out would pop the perfect yarn, right?  Well, not quite....

How not to burn your yarn...
Let's be honest here.... we are talking about putting yarn in the oven, and there is a very good chance it can burn if you do that. So how to do prevent that from happening? Wrapping it in plastic wrap keeps the steam in when microwaving, but something told me plastic wrap + oven = stinky mess.

To solve this dilemma, I do two things. First, I keep the yarn really damp...seems like common sense, if you want it to be damp, don't wring out all the water... but it is worth saying it.   Second, I put the yarn on cooling rack, that I place over a rimmed baking sheet, and then I add water to the baking sheet.  That way, when it is heat setting, the water can steam then yarn. You want to make sure you add enough that it doesn't just evaporate immediately, and you can always add more during the process.  This trick is borrowed from my baking escapades.... when I am baking cakes, I often will add a dish of water to the bottom of the stove to keep the oven moist, which helps you get a more level cake. 

MissReena gives it whirl!
My first attempt at using the oven to heat set my yarn was also my first attempt at dyeing speckled yarn with cake sprinkles.  The theory was there... put the yarn on the rack, dye parts of it, sprinkle parts of it, bake the coloury goodness into the yarn. So I set the oven to 180 degrees and started off on my great oven baked yarn adventure.

My Girly Sprinkles yarn on it's first round in the oven.
Now, for this yarn, I already knew I was going to bake it twice. I applied the dye and sprinkles to the top of the yarn, then heated it in the oven for 30 minutes (wanted to give it some extra time). When the yarn came out of the oven, I squished the sprinkles down with a fork, to really break them down and press them into the yarn. I then flipped the yarn over and dyed the other side.

Dyeing the other side of the yarn
Once the second side was dyed, I put more water in the bottom (along with the leftover dye from applying the new dye while still on the cooling rack), and popped it back in the oven for another 30 minutes.   When that was done, squish the speckles with the fork again, then let it cool. Honestly, I let it cool!  Which is super fast when it is on the cooling rack because the air can circulate much better.

Once the yarn was cool, I got my water ready in the sink, with a little bit of dish soap in it. I knew there was going to be residue from the sugary cake sprinkles, so I used the dish soap instead of the baby shampoo.  I started washing my yarn.  At first, everything was going really well... the sprinkles looked awesome, and the other colours looked pretty cool too.  

Then I noticed that the teal was start to bleed out of the yarn.  Oh well, not really a huge surprise....teal contains blue, and blue is notoriously a bugger to set. So I just kept rinsing....(Just keep rinsing, just keep rinsing..... borrowing a tune from Dory for this part).  The teal stopped bleeding, and I was just about to give the yarn it's final squeeze and get ready to dry it when the fuchsia started running.... It had not run during the whole time I was rinsing out the teal, and the water was fairly cool, so I was really surprised.  But not as surprised as I was going to be and the fuchsia just basically let loose and completely overdyed the white part of my yarn! 

When all the colour stopped bleeding, and the yarn was dried, I wound up with this very lovely yarn....
The final product....very pretty, but not quite what I was going for....

MissReena Tries Again
For the previous yarn, I had used my Americolor gel food colouring, and I used a lot for the teal, fuchsia and violet, so I thought maybe my issue was just oversaturation of the dyestock. I have been known to do that before....on more than on occasion.  This time, I was inspired by the neapolitan ice cream sandwich I was having as a treat. 

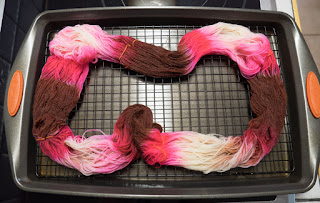
Cue the cooling rack again, and I dyed the yarn you see in the first picture in this post. Pretty sections of brown, surrounded by pink, with white spots left.  I sandwiched the brown between two bands of pink because I know that the brown will bleed, and the ends of the brown will bleed green, which I didn't not want in my ice cream colours... 

Once the dye was applied, I moved the yarn to my baking sheet/cooling rack setup, added my water, and popped it in the 180 degree oven again. This time I left it for almost an hour. Just in case my issue with the Girly Speckles was that it was not heated long enough. 

After I let the yarn cool on the rack (can you imagine? That is two skeins in a row I let cool!), I added it to the sink with baby shampoo and cool water for a rinse... and my pretty neapolitan inspired yarn tuned into what I am now calling Chocolate Cherry.... see any resemblance to the Girly Sprinkles?
Chocolate Cherry Yarn
Yup, you guessed it... the pink ran, and the white sections disappeared... 

Third Time is the Charm?
After the second one ran, I knew there was definitely an issue, and the issue was that the yarn was not getting hot enough.  Just because you set the oven to 180 degrees, does not mean the actual yarn is going to get up to 180 degrees, which means the dye may not completely set. 

So I painted a second ice cream inspired yarn, this time with the cooling rack placed over the sink, because my towel was in the washing machine. 

Let's try this again...
And I set my oven to 350 degrees... that is my go to temperature for a lot of things, so I figured, what the heck...worst that could happen is I could burn the yarn...but I figured if I kept a close eye on it, I could make sure that did not happen. 

I moved the yarn to the baking tray with the cooling rack, popped it into the oven after it had finished preheating, set the timer for 30 minutes, and basically become obsessive compulsive for about 30 minutes. 

I kept extra water beside me, and I probably opened the oven every 5 minutes to make sure things were still steamy and not burny.... I am sure the yarn would have set faster if I had not kept opening it, but when you are experimenting, you sometimes have to do these things.   I even kept my spray bottle of citric acid mix with me, and sprayed the top of the yarn a few times, although I am sure that was probably unnecessary... just me being paranoid.

I thought about covering the whole thing in tin foil to create that same kind of steam trap that plastic warp creates in the microwave, but decided against it, because if it started to burn, I may not see it. Plus, I was not sure what citric acid + tin foil + yarn + heat was going to equal. Better not to risk it.

After 30 minutes, I took the yarn out and set it on the stove to cool.  The brown travelled quite a bit in one of the pink sections, and the pink sort of took over a few other white sections, but I was still happy with what I saw. 

Freshly Baked Yarn!
I let this one cool most of the way (I was getting impatient at this point), and then proceeded to wash the yarn. Because this is superwash, it didn't need to be completely cooled because I don't have to worry as much about felting. I just made sure the water was the same temperature as the yarn, and I added my baby shampoo.  Then I took a deep breath, added the yarn to the water, and rinsed. 

The result? Neonpolitan Yarn! (Not a typo...that is what I called it due to the neon property of the pink)
One side of the skein...look at the pretty white sections!

And the other side... Can't you just smell the vanilla?
Verdict
Turn outs 180 degrees (F) is not a high enough heat to bring your yarn up to the right temperature. You need the oven to be at least 350 degrees in order for your yarn itself to get enough heat. And 30 minutes was a good time, although if I had blue in there, I might go as high as 45 minutes. But I would keep a close eye on the amount of water in the bottom, and add more if needed, to make sure that the yarn did not dry out. 

Will I use this method again? Most definitely! It was actually a lot of fun, once I got it figured out. Although I may switch to one of my older baking sheets... one thing to keep in mind is that with repeated exposure to citric acid and heat,  things like the cooling rack and the baking sheet may start to corrode over time. I had this happen with a round cooling rack I use when doing my ball-dyed yarn.

I may keep an eye out at some of the local second hand or restaurant stores. I know they make steam trays that are sort of like double boilers...water in the bottom and a tray that sits over the top with holes in it. If I can find one of those that will fit in my oven, I may snag it. I think I could do multiple skeins that way. 

If any of my readers try this, I would love to hear how it worked for you. But keep a close eye on it, and I take no responsibly for burned yarn if your oven is too hot, you don't add enough water, or you get distracted :)

Thursday, August 25, 2016

How To - Speckled Dyeing with Cake Sprinkles

Yup, you read that right... Cake Sprinkles!

I have to start off by saying that this idea came from a couple of fellow Ravellers, who got it from a post on Facebook.  Although I will admit that I have often looked at my sprinkles and wondered if they could be used... the one thing that held me back from trying it is the one word of caution I am going to give you all right at the very beginning, before I give you the how-to's of how I did this...

Cake sprinkles contain sugar, and sugar can burn yarn that is heated in the microwave!

I have been lucky enough that I have not had any mishaps with my yarn that I have heat set in the microwave, even when I used dyestock that had sugar in it, but there are many stories out there of people who were not so lucky with their yarn. I do not know what all the contributing factors were (possibly yarn content, strength of microwave, level of dampness of the yarn, etc.), but I do know it can happen, so if you are going to try this, please keep that in mind! Something to think about if you are every trying to use the already sweetened drink crystals too.... they contain a LOT of sugar and most of the burn victim yarns I have seen have used those.

What I used

  • 100g Bare Felici Superwash yarn from Knit Picks
  • Dinosaur shaped cake sprinkles (they were on sale)
  • Citric Acid powder (for soaking water and for spraying water)
  • Microwave safe plate 
  • Plastic Wrap
  • Baby shampoo
My Felici yarn from Knit Pick and my sprinkles

Couldn't resist the dinosaurs! There were pink ones!
Soak the yarn
Because this is a sort of hand painting that will be set in the microwave, I soaked the yarn in water that contained one tablespoon of citric acid powder.   I will say I have tried alternate heat setting methods (more on that in a later post) and even for those, I added my acid to the soaking water. 

Apply the sprinkles
When I got the Bulk Barn, they had these dinosaur sprinkles on sale. Because they had no white in them (don't need white on bare yarn), I snatched them up right away.  I removed a bunch of the water, but did not wring it out like I normally would with hand painting. I wanted the yarn to be really damp, but not so much that I was getting puddles on the plate. 

I also spread the yarn out on the plate. At first glance it looks like it will be a tangled mess, but it was quite easy to find the ties and pick it up with any tangles or fuss.

I sprinkled a whole bunch of dinosaurs on my yarn...
I spread out my yarn and let it be invaded with dinosaurs

And then, to be on the safe side, I mixed up my citric acid and water mixture (1 tablespoon citric acid powder to one cup of water) and put it in a spray bottle. I then used that spray bottle to give the top a really good spray. I wanted the yarn and the sprinkles to be really wet.
My spray bottle with the citric acid and water mix

Heat Set the Yarn
I wrapped the plate in plastic wrap and popped it into the microwave. I used my standard two minute intervals, but got distracted by laundry after I started the second interval, so that meant the yarn got to sit in the microwave for about 5 minutes before it got the 3rd two minute interval. Although I think this worked to my advantage, because the plastic wrap dropped down onto the yarn and it created a bit of a vacuum, which actually helped squish the sprinkles into the top of the yarn
Squished dinos! It may be hard to see in this picture, but there is plastic wrap on this plate...it is vacuum sealed it self to the yarn and flatted out all the former dinosaur sprinkles
Flip over and do the other side
One thing I have learned about any kind of hand painting is that the colour never goes all the way through, so you need to flip the yarn over and do the other side. I let the yarn cool until I could handle it, then flipped it over.
See? Hardly any colour on this side
I added a bunch more dinosaurs, then sprayed down with my citric acid mix, wrapped in plastic, and microwaved again.  As luck would have it, I had another load of laundry to go out, so I did the same thing... 2 of the two minute intervals, hang out laundry, then do 3 more intervals. I two more on this side than on the last because I knew I was not heating it any more after that.

Let it cool, rinse, then dry it
I removed the yarn from the microwave and set the plate on a cooling rack and removed the plastic wrap. It is really hot trying to do that, but it lets the yarn cool faster. 
See some of the leftover colour and sugar blobs? Some are on the plate, some are on the yarn...


For rinsing, I wanted to rinse while the yarn was still warm, so I could use warm water. Not all of the sprinkles completely disintegrate when heated. Some of them, and the non-colour components of the yarn, turn into these sort of sugary blobs of stuff....so you want to be able to use warm water with your baby shampoo or mild dish soap to get those out of the yarn.

After it was all washed, I actually hung it up outside to dry. I had all the best intentions, because it was a nice breezy day out. But after about an hour I got impatient (who me? never!), and brought it in and put it in the dryer. 

Twist it and admire the skein!
Normally I like a lot more colour in my yarns, even in my speckles, but I was really happy with how this one came out. It is a bit more of a muted speckled yarn, but I already have plans for it.
One side of my Dino Dots colourway

And the other side of the skein
I did do another skein where I had section of solid colour and sections of sprinkles. For that one I used the longer, flatter cake sprinkles. Again, I went for a combination that had not white in it, even those do seem to be rare. 
My dyes

My Girly Sprinkles Colourway
You can't see as much of the sprinkles with the way it is twisted, but you can still see them. 

Verdict - this is a lot of fun, and I can see myself checking out the Bulk Barn for their discounted sprinkles. It does not give as much coverage as my other sprinkle method, but this is definitely good for when I want more muted sprinkles.  And I have a friend who has a cupboard with a whole bunch of old sprinkles in it that she was thinking of throwing out, since she has no idea how old they are. Now she is going to give them to me to play with. 

Cautions - As I said at the beginning, sugar can burn in the microwave, so make sure the yarn is really damp, and well covered with plastic wrap. And keep a close eye on it.  

And beware of brown sprinkles....many times these are chocolate and that is going to be a whole other mess to deal with! 

Friday, August 19, 2016

To Sell or Not To Sell....

That is the question I have been asking myself for quite some time now.  I have had a lot of people comment on my yarn over the years, and the most frequent comment  hear is "You should sell your yarn!"

I was very hesitant to even think about it at first, because I have had issues in the past with trying to do creative things for a living.  I was a cake decorator for a while, and as much as I love decorating cakes, I HATED being a commercial cake decorator. To me, it sucked all the fun out of a hobby I quite enjoy.  Same thing with photography. I want to be able to make photographs because I want to, not because someone else wants me to.

But the more I think about it, the more I have come to the realization that this could be different. I would not be dying yarn because someone asked me for something in particular.  I would be creating one of a kind skeins of yarn, in my trademark impatient, sometimes haphazard way, and then posting them to see if someone else there wants to give them a forever home.

If I wake up in the morning and feel like today I want to dye a bunch of neon yarn, I can do that.  And if tomorrow I decide that I fancy a nice brown and green combo with a shot of hunters orange, I can do that.  If I decide I don't want to dye anything for a week, or a month, then it would just mean I would not have anything new to sell.   And if I completely and totally fell in love with a yarn when it was done, then I wouldn't have to sell it, and I could keep it if I wanted to.

I don't think I would want to do this as a full time job, just because the fun might go out of it quickly... but I could set up an Etsy shop and maybe once a month add some new years and see how they sell.  If I start dyeing more yarn, then I could do more frequent updates, but I wouldn't be tied to any particular amount or timeframe.  It would make my yarns somewhat elusive... you would have to try to catch them in their natural habitat for a brief period of time if you wanted to own one :)

How many of my readers out there are doing this? Selling something they make online? And if you are doing it, do you enjoy doing it? What are the pros and cons of it?

And for those of you waiting for more How-To dyeing posts, I am hoping to have a couple more in the next week or so. I want to try an alternate way to speckle dye, and I am also playing with an alternate heat source. I tried combining both today, and while I did not quite get the outcome I was expecting, so far I love what I am seeing.  Not that I will ever be able to replicate it! Hard to make exactly the same mistakes a second time ;)